2017年8月20日日曜日

NanoPi NEOを監視カメラに(ZoneMinder+nginxで動体検出)

先日入手した「NanoPi NEO」で監視カメラ(動体検出)を構築してみた。

動体検出としてはmotion一番有名だと思っているが、
今回は外部トリガー(例えば、焦電センサーとかSlackからの要求とか)に対応したく
ZoneMinderを使用してみた。

motion
 導入事例が多い、外部トリガーには対応していない?
ZoneMinder (github)
 導入事例がmotionに比べて少ない、設定項目が多く、プログラム自体も巨大?
 外部トリガーが出来るっぽい

ただし、ZoneMinderはwebサーバーにapacheが必要みたい。
なんとなく軽量にしてみたく、nginxを使用するように変更。

1.インストール
  sudo apt-get install zoneminder
  sudo apt-get install nginx-extras fcgiwrap php7.0-fpm
  sudo apt-get install mariadb-server

2.セットアップ
  (1) nginx
   /etc/nginx/sites-available/default の変更
    ・cgi-binとfastcgi_paramsのところ
##
# You should look at the following URL's in order to grasp a solid understanding
# of Nginx configuration files in order to fully unleash the power of Nginx.
# http://wiki.nginx.org/Pitfalls
# http://wiki.nginx.org/QuickStart
# http://wiki.nginx.org/Configuration
#
# Generally, you will want to move this file somewhere, and start with a clean
# file but keep this around for reference. Or just disable in sites-enabled.
#
# Please see /usr/share/doc/nginx-doc/examples/ for more detailed examples.
##
# Default server configuration
#
server {
listen 80 default_server;
listen [::]:80 default_server;
# SSL configuration
#
# listen 443 ssl default_server;
# listen [::]:443 ssl default_server;
#
# Note: You should disable gzip for SSL traffic.
# See: https://bugs.debian.org/773332
#
# Read up on ssl_ciphers to ensure a secure configuration.
# See: https://bugs.debian.org/765782
#
# Self signed certs generated by the ssl-cert package
# Don't use them in a production server!
#
# include snippets/snakeoil.conf;
root /var/www/html;
# Add index.php to the list if you are using PHP
index index.html index.htm index.nginx-debian.html;
server_name _;
location / {
# First attempt to serve request as file, then
# as directory, then fall back to displaying a 404.
try_files $uri $uri/ =404;
}
# pass the PHP scripts to FastCGI server listening on 127.0.0.1:9000
#
#location ~ \.php$ {
# include snippets/fastcgi-php.conf;
#
# # With php7.0-cgi alone:
# fastcgi_pass 127.0.0.1:9000;
# # With php7.0-fpm:
# fastcgi_pass unix:/run/php/php7.0-fpm.sock;
#}
# deny access to .htaccess files, if Apache's document root
# concurs with nginx's one
#
#location ~ /\.ht {
# deny all;
#}
location /zoneminder/cgi-bin {
gzip off;
root /usr/lib;
include fastcgi_params;
fastcgi_param SCRIPT_FILENAME /usr/lib/zoneminder/cgi-bin/nph-zms;
fastcgi_intercept_errors on;
fastcgi_pass unix:/var/run/fcgiwrap.socket;
}
location /zoneminder/ {
gzip off;
alias /usr/share/zoneminder/www/;
index index.php;
location ~ \.php$ {
include fastcgi_params;
# NOTE: You should have "cgi.fix_pathinfo = 0;" in php.ini
fastcgi_param SCRIPT_FILENAME $request_filename;
fastcgi_intercept_errors on;
fastcgi_pass unix:/run/php/php7.0-fpm.sock;
}
location ~* /zoneminder/.*\.(txt|log)$ {
deny all;
}
location ~* /zoneminder/.*\.(m4a|mp4|mov)$ {
mp4;
mp4_buffer_size 5M;
mp4_max_buffer_size 10M;
}
}
}
# Virtual Host configuration for example.com
#
# You can move that to a different file under sites-available/ and symlink that
# to sites-enabled/ to enable it.
#
#server {
# listen 80;
# listen [::]:80;
#
# server_name example.com;
#
# root /var/www/example.com;
# index index.html;
#
# location / {
# try_files $uri $uri/ =404;
# }
#}
view raw default hosted with ❤ by GitHub
  アクセス権付与し、再起動
  chown www-data:www-data /etc/zm/zm.conf
  systemctl restart nginx

 (2)mariadb
  ※ユーザー・パスワードは適宜変更、 /etc/zm/zm.confと合わせる
  create user 'zmuser'@'localhost' identified by 'zmpass';
  grant all on zm .* to zmuser;
  create database zm;
  mysql -u zmuser -p zm < /usr/share/zoneminder/db/zm_create.sql

 (3)php
  /etc/php/7.0/fpm/php.ini の変更
  「date.timezone = "Asia/Tokyo"」
  再起動
  /etc/init.d/php7.0-fpm restart

 (4)カメラへのアクセス権付与
  usermod -aG video www-data
  ※要再起動
  
 (5)その他
  /etc/sysctl.confを変更
  kernel.shmall = 268435456
  kernel.shmmax = 268435456
  sysctl -p
  ※本当に必要かわからない。 Orz
  8/30 追記
  ここに設定方法があった。
  使用しているNanoPi NEOは256MBだから半分の128MBにした
  
  kernel.shmall = 32768
  kernel.shmmax = 134217728


   ipcs -l 実行結果は以下の通り

------ Messages Limits --------
max queues system wide = 989
max size of message (bytes) = 8192
default max size of queue (bytes) = 16384

------ Shared Memory Limits --------
max number of segments = 4096
max seg size (kbytes) = 131072 = 128MB
max total shared memory (kbytes) = 131072 = 128MB
min seg size (bytes) = 1

------ Semaphore Limits --------
max number of arrays = 128
max semaphores per array = 250
max semaphores system wide = 32000
max ops per semop call = 32
semaphore max value = 32767

 (6)webページにアクセス
  http://[NanoPiNeoのIPアドレス]/zoneminder/index.php

  設定 > Paths > PATH_ZMSを変更
  /zoneminder/cgi-bin/nph-zms

3.映像確認
こんな感じ


手順まとめると大したことなかったけど、
もろもろ1週間位かかっているOrz

最後に自動起動するようにしておく
systemctl enable zoneminder
systemctl start zoneminder

あと、ディスク容量が逼迫した場合に古い記録から消す設定
How can I stop ZoneMinder filling up my disk?
http://zoneminder.readthedocs.io/en/latest/faq.html

次は検知時の映像をslackに投稿するぞー!

参考
 ・https://chiralsoftware.com/idea/nginx-ubuntu-and-zoneminder


NanoPi NEOを使ってみる(導入)

たまたま安価なlinuxボードを求めてさまよっていたら秋月電子で「Nano Pi NEO」 が売られているのを発見した。 しかも@1,680で。
ヒートシンク(@400)とSDカード、電源があれば動いてしまう!

世の中的には、Raspberry Pi Zero Wなんだろうけど、入手できないし・・・。
 こっちはUSBポートが3つあるので、いろいろ繋げられそう。
ただし、HDMI出力とかないので、セットアップ時は、シリアルコンソール必須だと思う。

 この手のlinuxボードはパット見安いけど、結局SDカードやら、電源やらで高くなるのがネックだ。
お金ないし。その点、FONはSDカードいらないけど、出来ること限られるしUSBがあるこっちの方がどうしても使い勝手は良いよね・・・。

そんな感じで、試しに使ってみることにした
合計:3,600円
 結構かかった。SDカード買っていたらもっと高くなってる!!
 ACアダプターなんだけど、トラッキング対策されていないOrz。 いいのかこれ。

組み立て


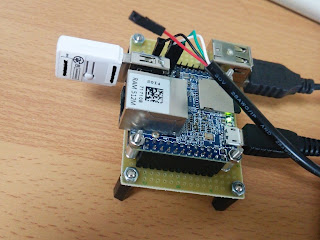
ちっこくてかわいい


OSの選択
公式?のnanopiOSは8GB以上のSDカードが必要っぽいので、
armbianを使ってみることにした。こっちだと1.8GBだし。
nanopi OS
armbian

簡単3ステップでOK
 1.SDカードにOSを入れて
 2.デバック用の端子にUSBシリアルケーブル接続
   接続先はURAT0で115,200-8-N-1

 3.電源ON!  -  armbian-configで環境設定